If you’re looking for the fastest way to knead bread dough, you’ve come to the right place. Food processor bread dough is the easy way to make fresh-from-your-home-oven bread!
![]()
This post may contain affiliate links, which means if you make a purchase through the link, I may make a commission at no cost to you. See my Affiliate Disclosure Policy for more information.
My long road to food processor bread dough
I’ve been baking bread a long time.
Like a . long . time.

That’s right. It’s me. 1985. John Cougar Mellencamp haircut.
And some fine bread.
This particular loaf was whole wheat, kneaded by hand in my warm and cozy cottage kitchen because that’s the kind of gnome person I was.
Correction: am.
These days, though, this gnomey has different priorities.
I still love homemade bread (who doesn’t?) but if the dough can be ready in 45 seconds instead of 20 minutes… Well, yeah. Tell me how!
Food processor bread dough by the book
This is the book that turned me on to making bread dough in the food processor.
Sadly, The Best Bread Ever by Charles Van Over is out of print, but there are used copies floating around on eBay and Amazon. If you end up loving this technique, I highly recommend that you search out a copy.
Stick with me for now, though, as I’ve taught hundreds of folks just like you this technique in my bread making classes. Together we can do it!
Ready? Let’s get started.
Here’s what you’ll knead: (See what I did there?)
- Food Processor
- Dough Blade
- Plastic Bench Scraper
- Dough Bucket + Lid
Food Processor
Let me start with a caveat: My experience with food processor bread dough is limited to Cuisinart machines.The motors are powerful enough to never stall, and the parts are rugged and replaceable.
I currently use the big a** 20 cup model, and over the past 10+ years have made literally thousands of pounds of dough in this baby. It shows no signs of stopping. (Nor do I, thank goodness.) Recipes using up to 6 cups of flour work well in this model.
If you have a smaller family or just want to make bread occasionally, the smaller 7 cup Cuisinart is also a powerhouse and can process recipes using 2-3 cups flour. These machines can be a bit pricey, so there’s no need to pay for more capacity than you need.
You can absolutely try making dough in a different brand of food processor. Just stay close, and if the motor begins to stall:
- cut the machine off and continue kneading by hand, bread maker or Kitchen Aid mixer
- put “Cuisinart food processor” on your Christmas list : )
food processor Dough Blade
You have a choice here of using a plastic dough blade or a metal chopping blade. I’ve used both but these days only recommend the plastic blade as it’s more efficient and less likely to split and degrade over time.
Plastic Bench Scraper
This is a flat plastic doohickey that helps you get the dough from the food processor to the rising bucket. It’s nice because it’s cheap, easy to clean and incredibly useful as a spatula and also to scrape dough bits off your kitchen counter.
Dough Bucket + Lid
After you mix the food processor bread dough you’ll need somewhere for it to rise.
I like to use a plastic bucket with matching lid. The lid keeps the dough nice and cozy, and the handle makes it convenient for moving the dough about. Plus it’s easy to clean and makes a nice storage tote for my plastic bench scraper, dough blade and other bread making supplies when not in use. Just make sure to get a food-safe bucket and to use it ONLY for bread.
Whoa. Okay, I think we’re ready to make the dough.
Into the work bowl of food processor add:
- 4 cups flour (see “What Type of Flour Should I Use” below)
- 2 tsp salt
- 1 tsp INSTANT dry yeast (make double bubble sure it’s instant and NOT active dry yeast)
Pulse a few times to combine. Then, with motor running, slowly pour 3/4 cup cool water through the feed tube. The dough should begin coming together into a shaggy mess. Here’s a photo of what you’re going for:
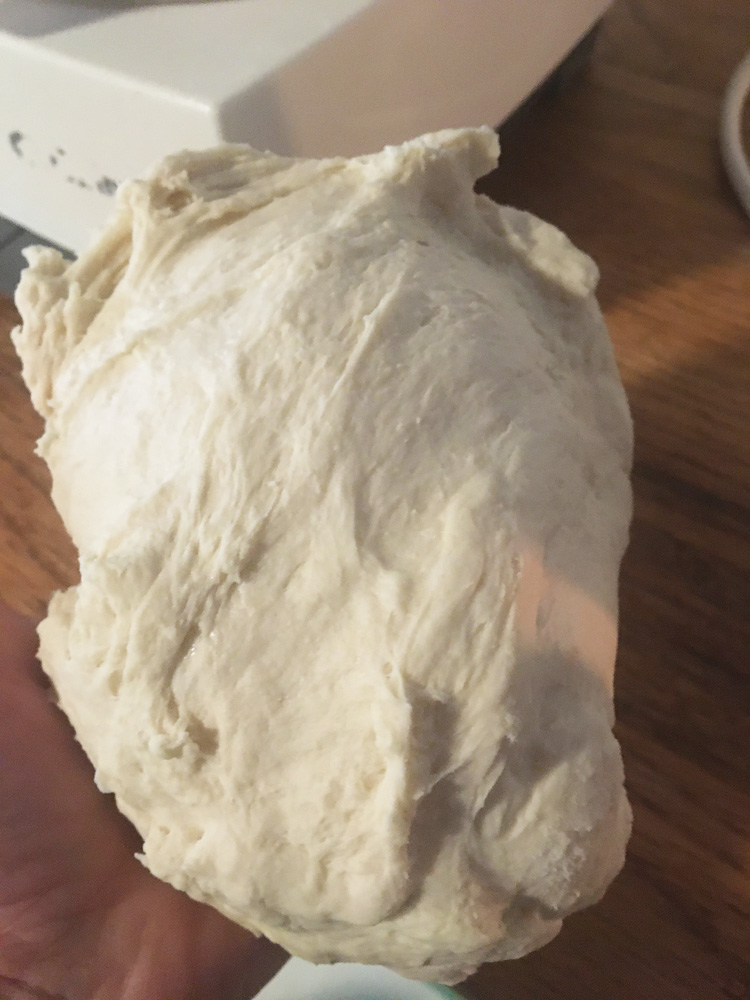
If all is well, continue running the food processor for 45 seconds.
If all is not well, you’ll need to make some adjustments:
If the dough remains in separate chunks, it’s too dry. Add water, a little at a time until shaggy mess is achieved.
If water is sloshing about, and the dough looks like pancake batter, it’s too wet. Turn the machine off and add flour, maybe 1/4 cup at a time, until, yes, shaggy mess.
As with everything, there’s definitely some trial and error required on the road to mastering the technique.
Once dough is the consistency you like, just use your plastic bench scraper to scrape it into the bucket. Pop on the lid, set the bucket in a warm or cool area depending on whether you want a fast or slow rise and wash up.
By the way, you’ll want to wash the food processor work bowl and blade right away. Once the dough remnants harden up they’re like concrete and super hard to remove!
That’s it! You’ve made food processor bread dough!
Yes, it’s really that easy.
Now you’re ready to form the dough into baguettes or whatever shape you choose.
What type of flour should I use?
Bread flour has more protein than all purpose flour. More protein means more gluten development which means more chew.
SO…
For more tender bread, use all purpose flour (less protein).
For chewier bread, use bread flour (more protein).*Whole wheat flour has roughly the same protein level as bread flour.
- For baguettes, I use 50% all purpose and 50% bread flour.
- For focaccia, I use 100% all purpose and add 2 tablespoons olive oil to the dough.
- For pizza crusts, I use 25% high gluten and 75% bread flour.
Problem Solving
If you’re still having trouble (or if you’re a bread nerd like me and just like this kind of information) here are a few notes/tips that might help:
- Temperature. While the food processor runs it creates heat, and while bread dough likes it cozy, too much warmth can kill the yeast. To make sure you don’t do such a vicious thing, use cool water and make sure to process the dough for only 45 seconds.
- In my experience, the biggest mistake folks make in bread baking is adding too much flour. If you’ve ever eaten hard, dry brick bread you know what I mean. In your trial and erroring, try to err on the side of a sticky dough — it will almost always produce a superior bread.

Food Processor Bread Dough
Equipment
- Food Processor with Dough Blade
- Plastic Bench Scraper
- Plastic Dough Bucket with Lid
Ingredients
- 4 cups flour use either all purpose, bread flour, high gluten or a combination depending on your project
- 2 tsp salt
- 1 tsp instant yeast not active dry yeast
- 1 ¾ cup water room temperature
Instructions
- Add flour, salt and yeast to the bowl of food processor. Pulse a few times to combine.
- With the motor running, slowly pour 1 ¾ cup room temperature water through the feed tube. The dough should begin coming together into a shaggy mess.
- If all is well, continue running the food processor for 45 seconds.
- If the dough remains in separate chunks, it's too dry. Add water, a little at a time until shaggy mess is achieved.
- If water is sloshing about, and the dough looks like pancake batter, it's too wet. Turn the machine off and add flour, maybe 1/4 cup at a time, until, yes, shaggy mess.
- Once dough is the consistency you like, just use your plastic bench scraper to scrape it into the bucket. Pop on the lid, set the bucket in a warm or cool area depending on whether you want a fast or slow rise.
- Wash up! You'll want to wash the food processor work bowl and blade right away. Once the dough remnants harden up they're like concrete and super hard to remove!
- Let the dough rise for approximately 1 hour, then proceed with your recipe.
Give it a go, and let me know how it…goes. Be sure to reach out if you have any questions and post photos of your lovely loaves at @camptopisaw.
pin it for later
Happy baking!

